Lava Iris 405+ Android Development

Lava Iris 405+ Android Development

Sunday, October 19, 2014

Walkman Music Player for Lava Iris 405+

 Walkman Music Player for Lava Iris 405+

           Are you bored of the default stock music player on your phone? Want a better music player? Then Walkman is for you.
        
         Lava Iris 405+ is a great device which deserves a great and smart music player. Walkman is the perfect music player you will love. Better music quality, outstanding equalizer and awesome interface. Plus, ClearAudio+ is a unique setting that will automatically give you more sound clarity.

         It works on both Android 4.2.2 Jellybean and Android 4.4.2 Kitkat, but it must be rooted and CWM recovery must be installed. If you don't know how to root, then check out these posts "Root Kitkat" if you are on kitkat & "Root Jellybean" if you are on jellybean.


 Requirements:-

1. Rooted Lava Iris 405+ (Kitkat or Jellybean)

Steps:-

1. Download Walkman and put the file in sdcard.
2. Switch off phone. Go to recovery mode by holding volume up and power key.
3. In CWM recovery, go to mounts and storage and mount /system.
4. Choose install zip from sdcard and select the zip file "Walkman_Iris_405plus.zip"
5. Reboot phone and enjoy the best music player.

Saturday, October 18, 2014

Transparent Status Bar on Jellybean - Lava Iris 405+

How to get transparent/semi-transparent status bar on Lava Iris 405+ Android 4.2.2 Jellybean

Fully Transparent Status Bar
Lockscreen Status Bar
Do you want to get transparent status bar on Lava Iris 405+ running Android 4.2.2 Jellybean? Yes you can get it, but on Home screen and Lock screen only.


Semi-Transparent Status Bar

Requirements:-

1. Lava Iris 405+ running Jellybean (ROOTED). If you don't know how to root then check out this post
"Root Lava Iris 405+ Jellybean"
2. Xposed Installer
3. GravityBox

Steps:-

1. Install Xposed Installer. Open it.
2. Click on Framework.
3. Click on Install/Update.

4. Reboot your phone.
5. Install Gravitybox. (Don't open it yet)
6. Open Xposed Installer.
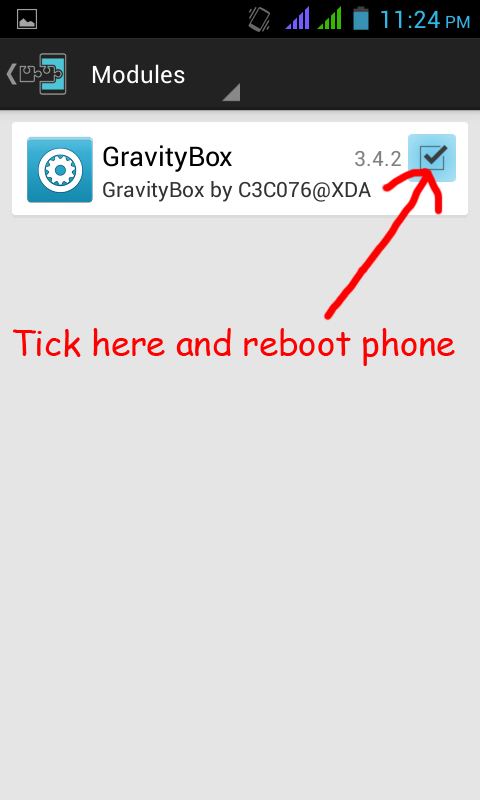
7. Click on Modules.
8. Tick GravityBox.
9. Reboot again.


10. Open GravityBox.
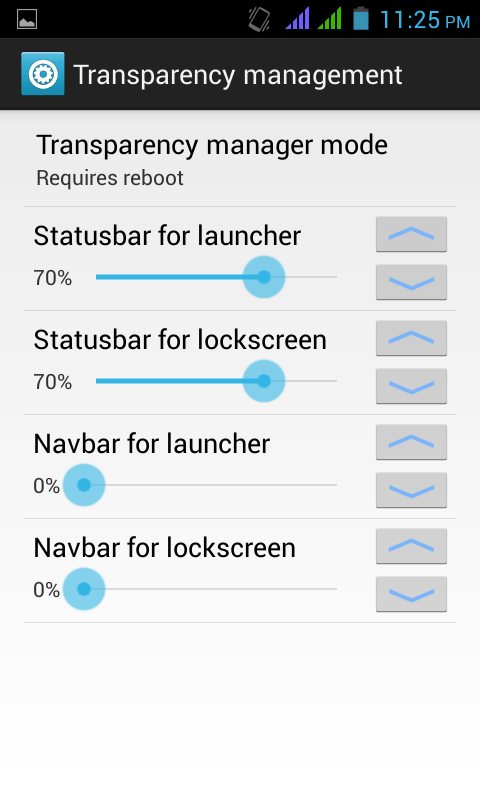
11. Click on Transparency Management.
12. Choose your desired level of transparency. Enjoy.


NOTE: This will work only on Jellybean. DON'T try it on Kitkat.

Thursday, October 16, 2014

All white status bar icons in Lava Iris 405+ Android 4.4.2 Kitkat (UPDATED)

Get all white status bar icons in Android 4.4.2 Kitkat

        After upgrading to Android 4.4.2 Kitkat on Lava Iris 405+, you may have noticed some changes. The most visible change is the status bar icons. As we know, with Android 4.4 Kitkat, Google has decided to finally get rid of the blue holo icons and change to white. But, in this phone, not all the icons are white. The signal bars and data connection indicators like (G, E, 3G and H) are still the same color (blue, orange, purple and green). If you want to get pure Android kitkat experience, then you may want to change those icons to white too. No any apps are able to change that (not even Xposed modules and Gravitybox). So, here I'm providing you the SystemUI.apk file which I have modded to change those icons to white.

NOTE: This is only for Lava Iris 405+ running Android 4.4.2 Kitkat. DON'T try it on Jellybean.


Requirements:

1. For this, you need to root the phone. If you don't know how to root, check out this article "Root Lava Iris 405+ Kitkat version".
2. SystemUI.apk

Steps:

1. Using root explorer, ES File Explorer or X-plore, go to root/system/priv-app folder.
2. Delete SystemUI.apk and SystemUI.odex file.
3. Then copy the downloaded SystemUI.apk file in that priv-app folder
4. Restart your phone and enjoy the white icons.

Wednesday, October 1, 2014

Root Lava Iris 405+ Jellybean 4.2.2 and install CWM recovery

Root Lava Iris 405+ running Android 4.2.2 Jellybean and flash CWM recovery without using PC

Do you want to root your Lava Iris 405+? Then you came to the right place. This tutorial shows you how to root this device and unlock it's true potential.
Rooting provides administrator permissions to the file system of the phone. After rooting, you can modify the system files but you gotta be careful not to damage critical files.
Follow the steps carefully.

Requirements:-

1. Lava Iris 405+ running Android 4.2.2 Jellybean
2. Framaroot
3. CWM recovery.img
4. Mobileuncle tools

Procedure:-

Rooting:

Download framaroot. Install it on your phone.
Open the app and click on Boromir.
Restart your phone and SuperSU will be installed.
Update the app from Play Store and install Busybox Pro

Installing CWM Recovery:

-Install mobileuncle tools
-Put recovery.img in sdcard
-Open mobileuncle tools and choose recovery update
-Choose recovery.img
-Reboot into recovery mode by pressing volume up key and power key.

ALL THE BEST

Flash Stock Rom on Lava Iris 405+

Flash Stock Rom on Lava Iris 405+/ Unbrick your phone

Bricked your Lava Iris 405+? Now unbrick it easily by flashing the stock ROM.

If you are an avid Android user, you may have rooted and tried to install some apps or custom ROMs or kernels and bricked your phone. Any Android device can get bricked when you perform advanced actions like flashing a custom rom or rooting the phone. The fear of bricking their device keeps many Android users from going advanced and thus prevents them from enjoying the many perks of rooting. When your phone is bricked, it will not turn on or it will face boot-loop (stuck in boot logo); it becomes useless as a brick. If you have already bricked your device and want to restore it to original, then this tutorial is for you.

Requirements:-

1. Lava Iris 405+ Android phone, USB cable
2. Lava Iris 405+ Stock Rom pack (drivers, SP flash tool and firmware included)
3. PC or laptop

Steps:-

-Extract the downloaded archive in any place. (Iris 405+ S115 2014-02-22)
-Install the drivers from the "Driver" folder. Choose according to your system whether it is 32-bit(x86) or 64-bit(x64)
-Keep USB cable connected to the back port of computer.
-Power off your phone, remove battery and again put battery in.
-Open "Flash Tool" folder and double-click on Flash_tool
-Click on Scatter-loading and choose "MT6572_Android_scatter.txt" from Firmware folder
-Now click on download.


Download Mode
-While pressing volume down key, connect USB cable to phone. Computer will detect the phone and the drivers will install.
-Download will begin and it will take a few minutes to complete. Once flashing is completed, a green ring will appear saying "Download OK"

-Disconnect phone and power on. All done. Factory reset the phone if you need to.
All the best.

Sunday, September 28, 2014

ROOT LAVA IRIS 405+ KITKAT VERSION

Root Lava Iris 405+ Android 4.4.2 Kitkat and install CWM Recovery


Here I'm going to teach how to root Lava Iris 405+ running kitkat. As we know, after upgrading to kitkat, we can't root it by using framaroot or vroot or any other methods. This method works well but you need patience.

Requirements:

-Lava Iris 405+ with Android 4.4.2 kitkat
-USB cable
-PC or laptop
1. MTK Droid Tools
2. Smart Phone Flash Tool
3. recovery.img
4. MT6572_Android_Scatter
5. Lava Iris USB Drivers
6. RootIris405plus.zip

-First of all install the drivers properly.
-Open SP Flash tool, click on scatter loading and select the MT6572_Android_Scatter.txt

-Tick only RECOVERY and double click on it. Select the recovery.img file.

-Click on Download.

-Switch off your phone and while holding volume down key connect phone with USB cable.


-SP flash tool will detect phone and Download will start and after completing download, DONT switch on. Disconnect USB cable and Go to recovery mode by holding volume up key.

-Open MTK Droid Tools and connect the phone while still in recovery mode. It will detect the device.

-Go to the tab "root, backup, recovery" and click on "SuperUser" and wait for it to finish.
-After it is finished, disconnect usb and in CWM recovery, choose install zip from sdcard and select the RootIris405plus.zip from sdcard
-Reboot your phone and your phone is rooted. Install busybox pro and update supersu app.
-Using root explorer or X-plore or ES File Explorer, providing root permission to them, go to root/system and delete the file recovery-from-boot.p to prevent CWM recovery from being deleted.
Before doing something critical, remember to create backup with CWM.
All the best
Enjoy.
If you have any problems, feel free to message me on shadynslim@gmail.com